Building RESTful APIs in Java: A Step-by-Step Tutorial
Introduction
In this tutorial, we will create a simple RESTful API using Java, Spring Boot, MongoDB and Maven for a travel app. It will allow us to Create, Read, Update and Delete Trips.
Prerequisites
Java Development Kit (JDK) 8 or later, installed on your system.
An Integrated Development Environment like IntelliJ IDEA.
MongoDB: This NoSQL database will serve as the storage house for our data. Download and install MongoDB from https://www.mongodb.com/try/download/community.
MongoDB Compass: This graphical user interface (GUI) will help us visualize and manage your MongoDB data.
Postman (optional) which can be used for testing our API.
What is a RESTful API?
REST stands for Representational State Transfer, a popular architectural style for APIs (Application Programming Interfaces). They are:
Resource-Based: Imagine your trip data as a collection of resources. Each trip can be accessed using a unique address (URI) like
/api/trips/123.Stateless: RESTful APIs forget past requests. Each interaction stands on its own, making them efficient and scalable.
Standard HTTP Methods: These APIs use familiar HTTP verbs for actions:
GET: Retrieves data (e.g., GET all trips using
/api/trips).POST: Creates new resources (e.g., POST a new trip).
PUT: Updates existing resources (e.g., PUT updates a trip with ID 123).
DELETE: Removes resources (e.g., DELETE a trip).
This standardized approach makes RESTful APIs easy to develop and understand.
Step 1: Setting up the Project
Create a Project
Use Spring Initializr (https://start.spring.io/) or your IDE to create a new Spring Boot project.
Select
Mavenas the ProjectAdd the
WebandSpring Data MongoDBdependencies.Complete the Project Metadata accordingly but ensure the packaging is Jar.
It should look similar to this after you have added the dependencies and metadata information.

Next, you can generate the project and it creates a basic project structure with Spring Boot and MongoDB integration.
Setting up our Database
Installation and Starting the MongoDB Service:
Follow the official MongoDB and MongoDB Compass installation guides for your operating system. Once they are completed, start the service.
Creating a DataBase in MongoDB Compass
While Spring Boot can interact with an existing database, Compass provides a user-friendly way to create and manage them visually. Here's how to create a database for our app:
Launch Compass and it will automatically detect a running MongoDB instance on your local machine
In the Connections panel on the left, click the "+" button to add a new connection.
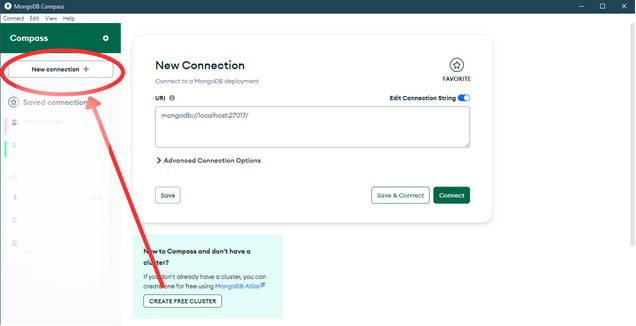
Compass should automatically populate the connection details. Otherwise, provide the hostname (
localhost) and port (27017) where your MongoDB server is running.Click "Connect."
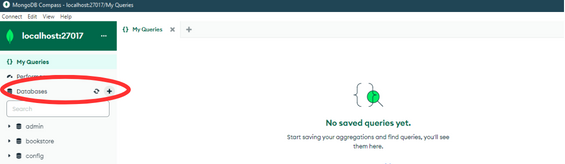
In the Compass navigation pane, click the "Databases" tab. This displays a list of existing databases.
Click the "+" button next to "Databases" to create a new database.
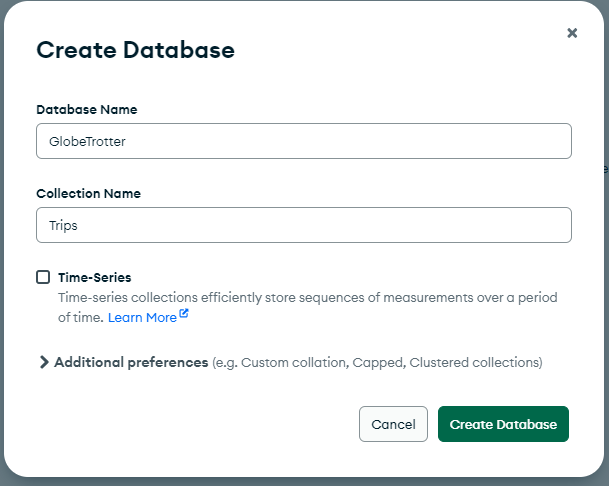
You can then enter your desired database name (e.g.,
GlobeTrotter), collection name (e.g.,Trips)and click "Create Database"
Your new database is now created in MongoDB and ready to be used by your Spring Boot application.
Adding the Database to our project
In your project's application.properties file, add the following lines to configure the connection to your MongoDB instance:
spring.data.mongodb.uri=mongodb://localhost:27017/
spring.data.mongodb.database=GlobeTrotter
Unlike traditional relational databases, MongoDB offers a flexible schema approach. This means you don't need to strictly define your data structure (entity classes) before storing data.
Step 2: Defining the Data Model
Now that we have a Spring Boot project set up with MongoDB integration and a database ready, let's define the data model for our app. Let's create a simple Java class that represents Trip .
package com.zainab.GlobeTrotter.trip;

import org.bson.types.ObjectId;
import org.springframework.data.annotation.Id;
import org.springframework.data.mongodb.core.mapping.Document;
import java.util.List;

@Document("Trip")
public class Trip {
    @Id
    private ObjectId id;
    private String name;
    private String destination;
    private String description;

    public Trip(){

    }

    public Trip(String name,  String destination , String description){
        this.name = name;
        this.destination = destination;
        this.description = description;
    }

    public String getName() {
        return name;
    }

    public void setName(String name) {
        this.name = name;
    }

    public String getDestination() {
        return destination;
    }

    public void setDestination(String destination) {
        this.destination = destination;
    }
    public String getDescription() {
        return description;
    }

    public void setDestination(String destination) {
        this.description = description;
    }
}
Let's break down the fields:
@Document(collection = "Trips"): This annotation specifies that this class maps to a collection named "trips" in MongoDB.@Id: This annotation marks theidfield as the unique identifier for each trip document. Spring Data MongoDB will automatically generate IDs for new trips.name: A user-friendly name for the trip.destination: The city or location where the trip takes place. We'll use a string for now, but this could be expanded to include a reference to a more detailed destination model in the future.description: A text field allowing users to add a brief description of their trip plans.
Flexibility of NoSQL Schemas
As a NoSQL Database, MongoDB's flexible schema allows you to add new fields to your Trip class later on. For example, you might want to include:
A list of planned activities or itinerary items.
Estimated budget for the trip.
Links to travel resources or booking information.
By leveraging this flexibility, you can gradually enhance your data model to accommodate the growing needs of your trip planner application.
Step 3: Data Access with Spring Data MongoDB
Spring Data MongoDB provides interfaces to interact with MongoDB collectionsthat eliminates the need for manual interaction with drivers or queries. We can create an interface extending MongoRepository<T, String> to define methods for CRUD operations on our trip data.
Here's the TripRepository.java interface:
public interface TripRepository extends MongoRepository<Trip, String> {
}
Step 4: The Service Layer
We have defined a data model (Trip.java) and set up communication with MongoDB using Spring Data MongoDB repositories (TripRepository), which is the groundwork for building RESTful controllers. Now, we need to implement the data access logic. However, directly placing all logic within controllers can lead to maintenance challenges. This is where the concept of a service layer comes into play.
Imagine a service layer as a mediator between your controllers and your data access layer (repositories). It encapsulates the business logic related to managing trip data, promoting code reusability and improved separation of concerns.
Building the Trip Service
Let's create a TripService class to manage trip-related operations:
Java
@Service
public class TripService {

  @Autowired
  private TripRepository tripRepository;

  public List<Trip> getAllTrips() {
    return tripRepository.findAll();
  }

  public Trip getTripById(String id) {
    return tripRepository.findById(new ObjectId(id)).orElse(null);
  }

  public Trip createTrip(Trip trip) {
    return tripRepository.save(trip);
  }

  public Trip updateTrip(Trip trip) {
    return tripRepository.save(trip);
  }

  public void deleteTrip(String id) {
    tripRepository.deleteById(id);
  }
}
The @Service annotation marks this class as a Spring service bean. We injected the TripRepository dependency using @Autowired to access MongoDB through the repository methods. Spring Data MongoDB provides methods like findAll(), findById(), save(), and deleteById() which we can leverage directly for CRUD operations on trip data.
This service acts as a central point for managing trip data, keeping the controllers clean and focused on handling API requests.
Step 5: Creating the Controller
Now that we have a service layer (TripService) to manage trip data, let's create RESTful controllers to handle incoming API requests from your trip planner application. Controllers define endpoints (URLs) that map to specific functionalities and handle HTTP methods (GET, POST, PUT, DELETE) for CRUD operations on your data.
Let's create a TripController class:
Java
@RestController
@RequestMapping("/api/trips")
public class TripController {

  @Autowired
  private TripService tripService;

  @GetMapping
  public ResponseEntity<List<Trip>> getAllTrips() {
    List<Trip> trips = tripService.getAllTrips();
    if (trips.isEmpty()) {
      return new ResponseEntity<>(HttpStatus.NO_CONTENT);
    }
    return new ResponseEntity<>(trips, HttpStatus.OK);
  }

  @GetMapping("/{id}")
  public ResponseEntity<Trip> getTripById(@PathVariable String id) {
    Trip trip = tripService.getTripById(id);
    if (trip == null) {
      return new ResponseEntity<>(HttpStatus.NOT_FOUND);
    }
    return new ResponseEntity<>(trip, HttpStatus.OK);
  }

  @PostMapping
  public ResponseEntity<Trip> createTrip(@RequestBody Trip trip) {
    Trip savedTrip = tripService.createTrip(trip);
    return new ResponseEntity<>(savedTrip, HttpStatus.CREATED);
  }

  @PutMapping("/{id}")
  public ResponseEntity<Trip> updateTrip(@PathVariable String id, @RequestBody Trip trip) {
    trip.setId(id);
    Trip updatedTrip = tripService.updateTrip(trip);
    if (updatedTrip == null) {
      return new ResponseEntity<>(HttpStatus.NOT_FOUND);
    }
    return new ResponseEntity<>(updatedTrip, HttpStatus.OK);
  }

  @DeleteMapping("/{id}")
  public ResponseEntity<Void> deleteTrip(@PathVariable String id) {
    tripService.deleteTrip(id);
    return new ResponseEntity<>(HttpStatus.NO_CONTENT);
  }
}
@RestController: This annotation marks the class as a RESTful controller, indicating it handles incoming API requests.
@RequestMapping("/api/trips"): This defines the base path for all trip-related endpoints exposed by this controller. Any request URL starting with "/api/trips" will be directed to this controller.
GET /api/trips: Retrieve All Trips
@GetMapping
public ResponseEntity<List<Trip>> getAllTrips() {
  List<Trip> trips = tripService.getAllTrips();
  if (trips.isEmpty()) {
    return new ResponseEntity<>(HttpStatus.NO_CONTENT); // No trips found
  }
  return new ResponseEntity<>(trips, HttpStatus.OK);
}
@GetMapping: This annotation specifies that this method handles GET requests to the base path "/api/trips". This endpoint retrieves all trip documents stored in MongoDB.List<Trip> trips = tripService.getAllTrips(): This line calls thegetAllTrips()method from the injectedtripServiceto retrieve all trip data.if (trips.isEmpty()) {...}: This checks if the retrieved list of trips is empty. If there are no trips, aResponseEntityis created with an empty body andHttpStatus.NO_CONTENT(204) status code, indicating no content is available.return new ResponseEntity<>(trips, HttpStatus.OK): If trips are found, aResponseEntityis created containing the list ofTripobjects and anHttpStatus.OK(200) status code, signifying successful retrieval.
GET /api/trips/{id}: Retrieve a Trip by ID
@GetMapping("/{id}")
public ResponseEntity<Trip> getTripById(@PathVariable String id) {
  Trip trip = tripService.getTripById(id);
  if (trip == null) {
    return new ResponseEntity<>(HttpStatus.NOT_FOUND); // Trip not found
  }
  return new ResponseEntity<>(trip, HttpStatus.OK);
}
@GetMapping("/{id}"): This annotation defines a path variable named "{id}" within the URL. This allows capturing the ID value from the request URL (e.g., "/api/trips/123").Trip trip = tripService.getTripById(id): This line calls thegetTripById(id)method from thetripServiceto retrieve a specific trip document based on the captured ID.if (trip == null) {...}: This checks if the retrieved trip object is null, indicating the trip with the provided ID wasn't found. If not found, aResponseEntityis created with an empty body andHttpStatus.NOT_FOUND(404) status code.return new ResponseEntity<>(trip, HttpStatus.OK): If the trip is found, aResponseEntityis created containing the retrievedTripobject and anHttpStatus.OK(200) status code.
POST /api/trips: Create a New Trip
@PostMapping
public ResponseEntity<Trip> createTrip(@RequestBody Trip trip) {
  Trip savedTrip = tripService.createTrip(trip);
  return new ResponseEntity<>(savedTrip, HttpStatus.CREATED);
}
@PostMapping: This annotation signifies that this method handles POST requests to the base path "/api/trips". This endpoint is responsible for creating a new trip document in MongoDB.@RequestBody Trip trip: This annotation indicates that the request body contains the JSON data for the new trip. Spring Boot automatically parses the request body and maps it to aTripobject.Trip savedTrip = tripService.createTrip(trip): This line calls thecreateTrip(trip)method from thetripServiceto save the new trip data (provided in the request body) to MongoDB. The savedTripobject is stored in thesavedTripvariable.return new ResponseEntity<>(savedTrip, HttpStatus.CREATED): AResponseEntityis created containing the newly createdTripobject and anHttpStatus.CREATED(201) status code, indicating successful creation.
PUT /api/trips/{id}: Update an Existing Trip
@PutMapping("/{id}")
public ResponseEntity<Trip> updateTrip(@PathVariable String id, @RequestBody Trip trip) {
  trip.setId(id); // Ensure ID matches path variable
  Trip updatedTrip = tripService.updateTrip(trip);
  if (updatedTrip == null) {
    return new ResponseEntity<>(HttpStatus.NOT_FOUND); // Trip not found to update
  }
  return new ResponseEntity<>(updatedTrip, HttpStatus.OK);
}
@PutMapping("/{id}"): This annotation specifies that this method handles PUT requests to the URL pattern "/api/trips/{id}". This endpoint allows updating an existing trip document in MongoDB based on the provided ID.@PathVariable String id: This annotation captures the ID value from the path variable in the URL.@RequestBody Trip trip: This annotation indicates that the request body contains the updated trip data in JSON format. Spring Boot parses the request body and maps it to aTripobject.trip.setId(id): This ensures that the ID in the request body matches the ID in the URL path variable and helps us avoid accidentally updating a different trip.Trip updatedTrip = tripService.updateTrip(trip): This line calls theupdateTrip(trip)method from thetripServiceto update the existing trip document in MongoDB with the provided data. The updatedTripobject is stored in theupdatedTripvariable.if (updatedTrip == null) {...}: This checks if theupdatedTripobject is null. A null value indicates that no trip was found with the provided ID for update. If not found, aResponseEntityis created with an empty body andHttpStatus.NOT_FOUND(404) status code.return new ResponseEntity<>(updatedTrip, HttpStatus.OK): If the update was successful, aResponseEntityis created containing the updatedTripobject and anHttpStatus.OK(200) status code.
Testing the API
You can now test your API endpoints using tools like Postman or cURL.
Conclusion
By building a data model, data access repository, service layer and RESTful controller, we've established the core functionalities for a trip planner API. You can also expand the API by implementing features like user authentication, authorization and integrating with other services for functionalities like weather information or travel recommendations.
Happy coding!
